This tutorial is mostly based on Layer style settings and a combination of a lot of Curves. When combined together, they give a rich, deep and glossy / beveled look to the text.
Let’s get started, create a new canvas, we used 600*500 size and filled it with very dark blue-gray color: #2d3134. We also made a little spot in the middle, to highlight the future effect.
Using Arial Rounded MT Bold font, type your word.
Since we are going to create a “liquid” metal effect, we want the letter to organically stick to each other and create the illusion of liquid material filling them, so for this purpose we seen to set the tracking for the selected characters to -40. If you are using very big font or simply another font where characters are placed more far apart, you will need to set this setting to -100 or maybe even more. Just look and see what seems to be the best option for your font.
No the most important part begins, go to layer styles palette (Layer >> Layer Styles >> Blending Options) and start applying the following values to each Option you have on the left column…
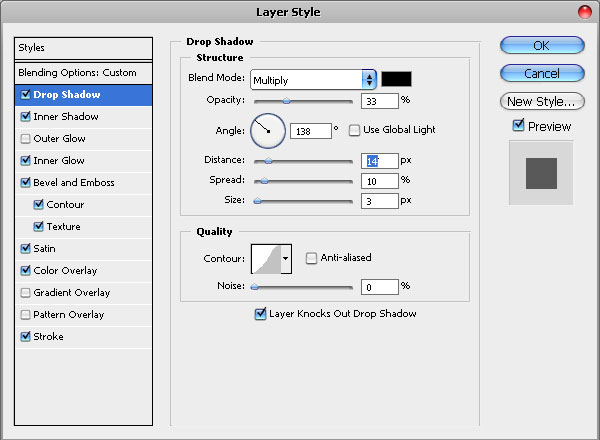
Begin with dropping the shadow. We wanted to have a relatively sharp shadow, so we set the size to 3, however if you wish to have it more blurred, chose settings of 15pixels or bigger.
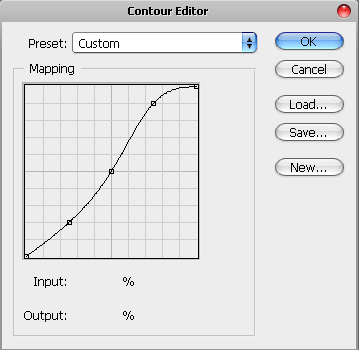
For the shadow’s quality, we made a custom Contour, please see the mapping below:
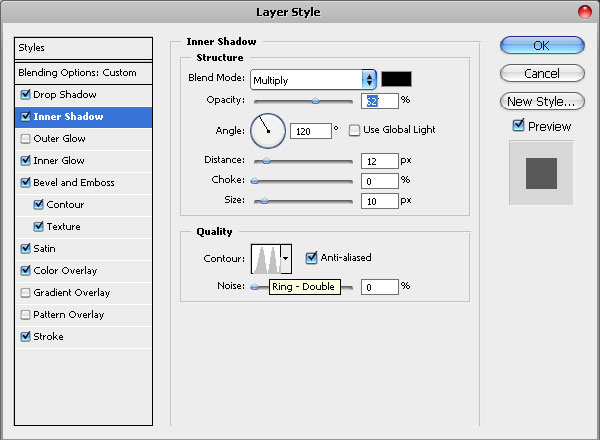
Proceed to Inner Shadow…
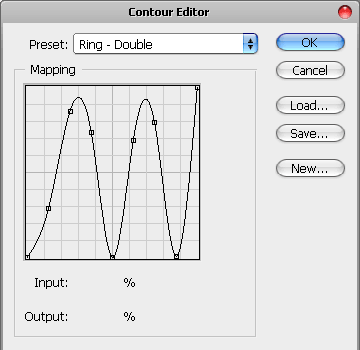
here we used Ring – Double Contour settings for the Quality, if you don’t have these contours in your Photoshop, please see our mapping:
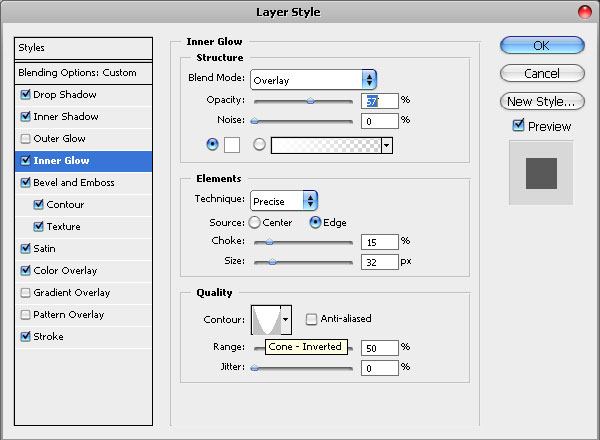
Inner Glow is also important, the more opacity you are going to add, the paler your text will end up being so we decided to set it to 57%, I could have reduced it to even less but then it would be hardly visible. All depends on the initial color you are working with.
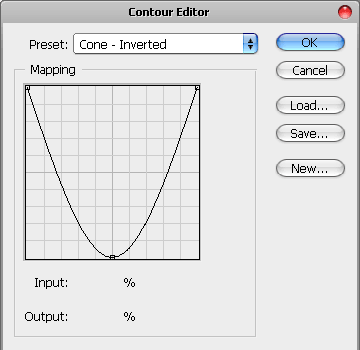
Use the following Photoshop Contour for Inner Glow settings:
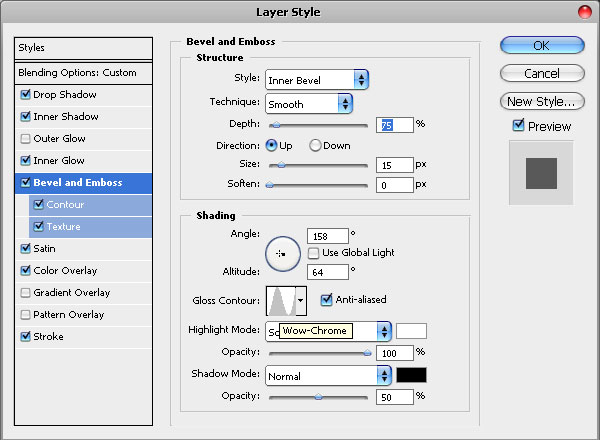
Now the more trickier parts begin when we start adjusting the Bevel and Emboss settings as this is pretty much what makes our effect look so great. First apply the basic bevel and emboss settings as you see below
We will be using the “Wow Chrome” curve, please see below how to construct it on your own. It’s a little complicated to create one yourself so if you have it pre-installed in Photoshop — will save you a lot of work.
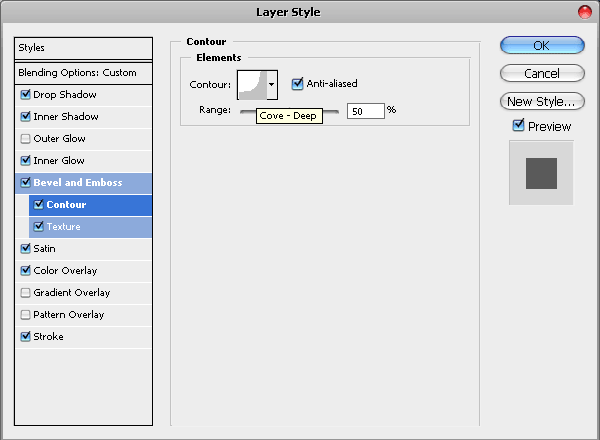
Inside the Bevel and Emboss settings, there is a sub-menu, where you can set settings for Contour and texture. In this effect we will employ both to create a really rich and unique effect. First the Contour settings, using Cove-Deep contour with 50% range..
And this is how you make the Cove Deep contour…
Move down to the Texture settings inside your Bevel and Emboss menu, and use any web 2.0 strip pattern as an overlay. If you download the PSD file, the pattern will come included in the Texture Patterns so you won’t need to add anything, however if you won’t download the psd and don’t have any pattern of that kind, either replace it with any other you have and experiment with different results. I played around with other textures and must say that for these Layer Style settings pretty much any texture will look cool!
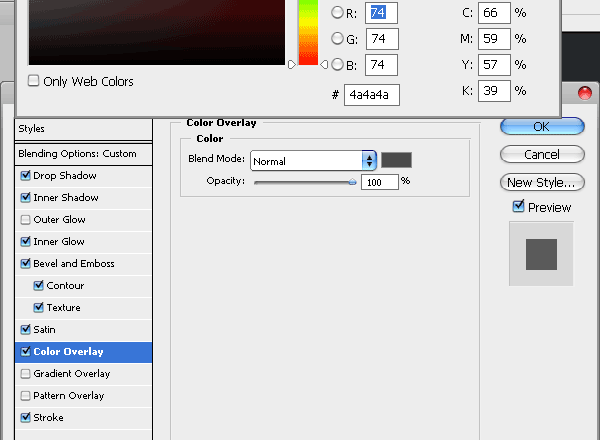
Overlay the color of your letters with dark gray #4a4a4a color.
Finally, to give our text effect a more neat effect we are going to Stroke this text with a 1 pixel white line, however, when i just added the white line around the text i felt that it’s too sharp and looks a little irritating so I have reduced the opacity to 76%, which i think made the Stroke effect look neat and less dominating.
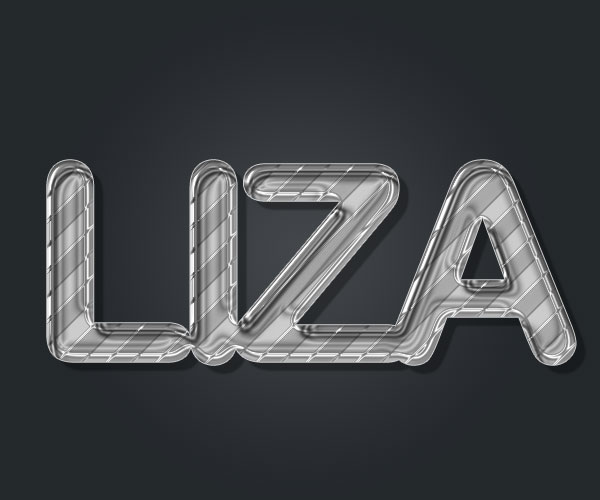
And, here is what we have got. You see, since our letters were too close to each other, the effects we have created nicely “glue” the letters together.
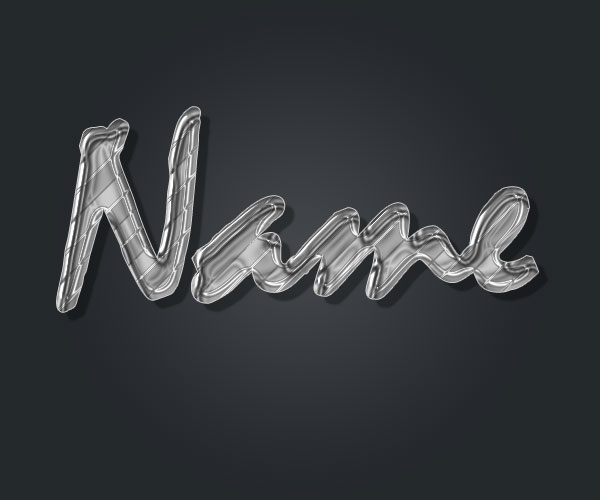
You can also apply this effect with a hand written text, it will look even better! (here is an example with “Mistral” font). Hope you enjoyed the tutorial and feel free to download the psd so you will have better and faster way to learn and play around with these effects. If you do download the source files, please remember to click the “return to merchant’s website” after the purchase, in order to start the download instantly!
About the Author

Segala
Penulisan Artikel Didalam Blog Ini Adalah Terpelihara. Anda dilarang
sama sekali meniru, mengambil, mencetak atau mempamir apa sahaja isi
kandungan didalam blog ini tanpa izin daripada pengarang. Tindakan tegas
akan diambil jika anda gagal mematuhi hak-hak dan syarat-syarat yang
telah ditetapkan oleh pengarang!!!
Follow Me on Twitter [at]
Putera30